Introduction #
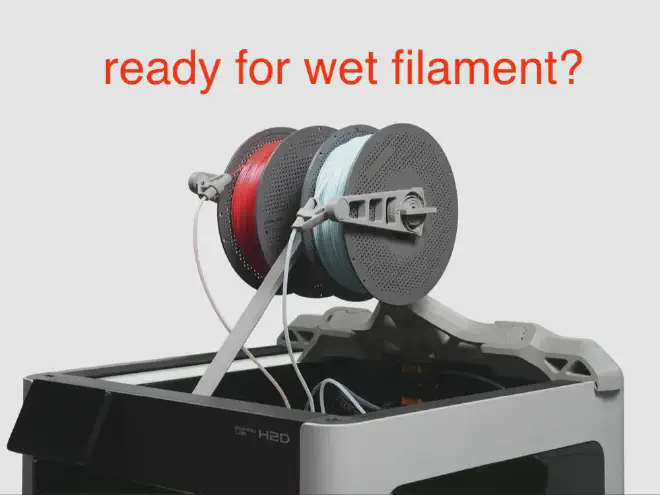
I needed a way to print really soft TPU from a dry box without needing to top feed it, since my AMSes live on top of my printer. This is how I do it.
The Problem #
Bambu says you should feed TPU from the top of your printer, directly into the extruder. Their official top-mount for the H2D doesn’t even enclose the TPU, which is a recipe for moisture-laden TPU and crappy print results. They don’t even use it in their official guide on the wiki.
If you have the room for it, there are models to make top-printing TPU suck less.
But there are alternatives that let you avoid that hassle of top-printing completely. Here’s how I use an external buffer unit to print TPU without all the hassle.
TPU Tamer #
On the Bambu discord, user @arlock_og mentioned he was using an external buffer to print TPU. He posted a Makerworld model to replace the top plate of the buffer unit, and posted instructions for how to use it.
How it works #
The problem with flexible filament #
Normally, the extruder is doing two jobs:
- pulling filament in from the spool
- pushing filament out through the hotend
With normal rigid filament, the friction in the PTFE path isn’t enough to cause problems.
Flexible filament has higher surface friction, and this can cause the filament to get stuck in PTFE tubes or just stretch. This leads to poor print quality, air printing, or “extruder tension too high” errors.
The fix #
With the TPU Tamer, this external buffer pushes filament to the extruder. The extruder doesn’t have to do any of the work to pull it through the PTFE path, and can focus on pushing it through the hotend.
It’s like an AMS, but simpler; it doesn’t need any control signals between itself and the printer. And because the tension is tunable on the LLL Plus, you can use it for flexible filament like TPU.
Operating principle #
Here’s an annotated photo of the Mellow LLL Plus buffer.
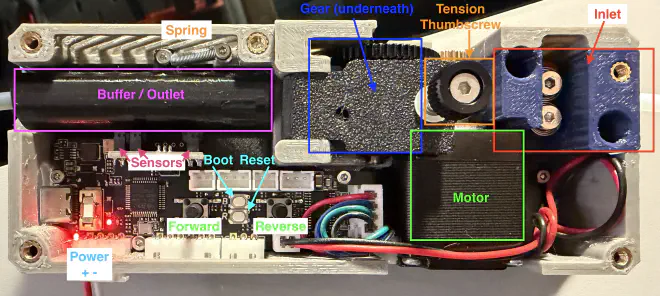
Here’s a short video showing the unit in action. Inlet is on the right, outlet is on the left.
It has two modes we care about in normal operation:
- Push
- Pause
The sensors tell the unit’s brains where the buffer is, and that dictates what the motor does.
When there is high resistance on the filament (the filament path is full), the buffer gets pushed away from the gear. This is the Pause mode.
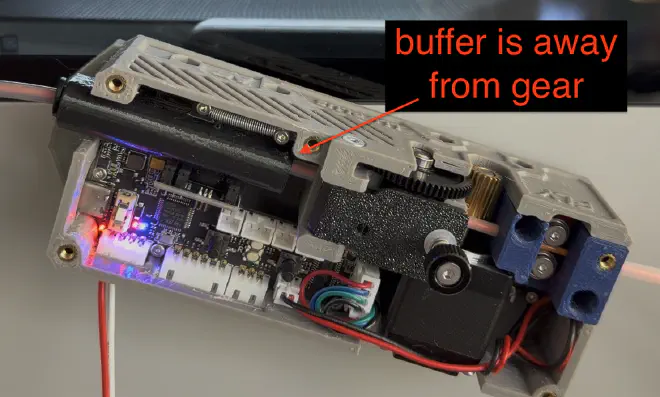
When there is low resistance on the filament (the extruder wants more filament), the buffer gets pushed towards the gear. This is the Push mode.
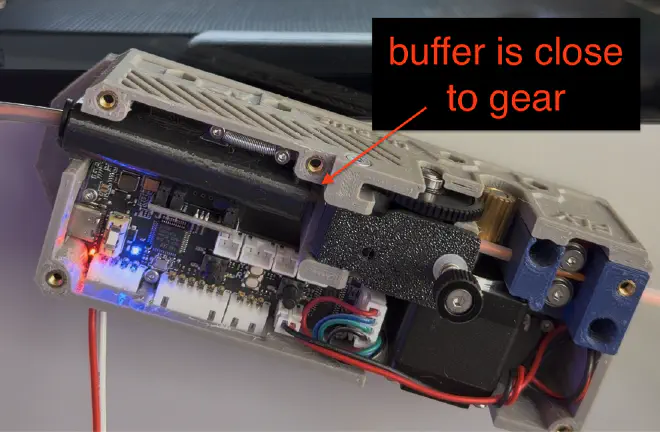
It basically cycles between these two modes, which keeps the filament pushed up to the extruder all the time.
It’s a simple concept that works really well.
So you want one? #
Shopping List #
This list assumes you don’t want to solder or crimp wires.
- Mellow LLL Plus Filament Buffer. I suggest getting the pre-assembled version.
- 24v power supply - doesn’t need much power
- Amazon ↗ : includes barrel plug adapter. You’ll need one if you order a different power supply.
- 0.3x3x15mm extension spring
- I can’t find a good source for this that isn’t a giant pack of springs.
- Amazon ↗ : That said, this is the pack I got.
- pre-wired/crimped JST XH 4P connector
- Large Command Strips for mounting the buffer to your printer
- Amazon ↗
- PTFE tubing (assuming you don’t already have some)
- Amazon ↗ : includes couplers and cutter
- Flexible filament (I’ve used these)
- Something to print your flexibles from (assuming you don’t already have something)
Assembly #
Print the TPU Tamer model. It replaces the top plate of the unit, and gives you access to the path in case the filament pops out of the inlet. He also has recommendations for swapping out the buffer extension spring.
Replace the buffer extension spring with a 0.3x3x15mm extension spring.
Power #
Triple check your polarity!
The unit puts positive (normally red) on the first pin of the connector.
Many JST XH 4P connectors have the red wire on the second pin.
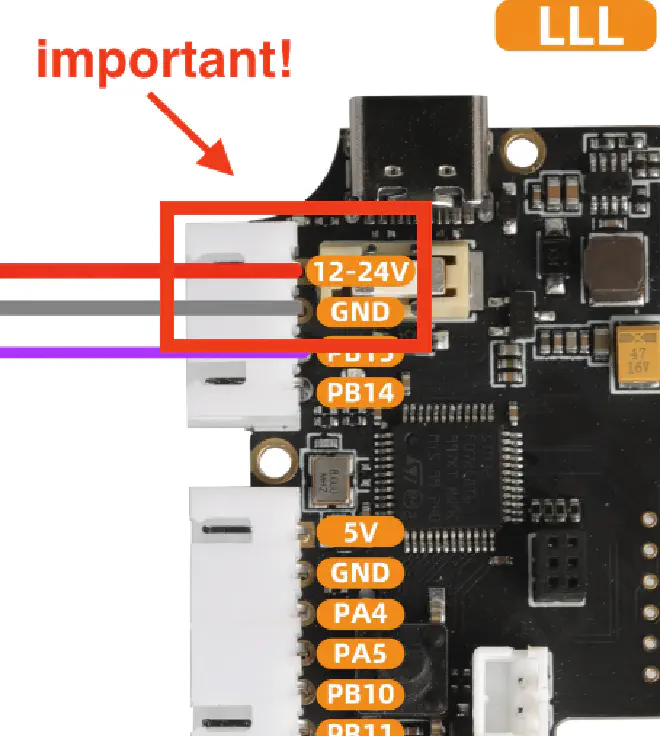
If your connectors are colored backwards, you can swap the position of the pins in the connector by pushing down the small metal tab on the pin and sliding it out. You only need the 24v and ground pins; remove the rest if you’d like.
Screw your wires into the barrel plug adapter that came with your power supply. Plug your barrel plug into your power supply.
TRIPLE CHECK YOUR POLARITY. Get a multimeter out and CHECK THE VOLTAGE before plugging it in. You don’t want to fry the unit.
You don’t need to power the unit yet.
Update the firmware #
Adam L’s Makerworld model has instructions for updating the firmware on linux and windows.
For a Mac, you’ll need homebrew installed1.
Grab the latest firmware from Mellow’s docs page. This page has changed in the past (and has a typo as of 2025-09-29), so you may need to browse for it. You want firmware for the “FLY-LLL Plus Buffer”.
- Plug the unit into your computer via its USB-C port. You don’t need 24v power for this.
- Press and hold the BOOT button on the unit
- Press the RESET button
- Release the RESET button, then release the BOOT button
- Run the following commands to update the firmware:
brew install dfu-util
# assuming you've downloaded the firmware to the current directory
# and it's named buffer_v1.1.0.tar.gz
dfu-util -a 0 -d 0483:df11 --dfuse-address 0x08000000 -D buffer_v1.1.0.bin
Firmware is now updated. Unplug the unit from your computer.
Bench test it #
Before you mount the unit to your printer, bench test it.
Reverse needs to be held down to function.
Double clicking any button will stop the motor.
Clicking any button will resume normal operation.
Tuning the gear tension #
- Attach two pieces of PTFE tubing to the unit’s inlet and outlet. They should be longer than your closed fist. These are sacrificial and will be thrown away.
- Cut a ~1m long piece of your flexible filament
- Power up the unit
- Unscrew the thumbscrew on the top of the unit completely. Then screw it back in just enough to start the threads.
- Push your filament into the unit, until it reaches the extruder gear
- Tighten the thumbscrew on the top of the unit until the extruder catches your filament. Turn the thumbscrew a half-turn more for good measure.
- It should start extruding forever
- Before it completes, hold down the reverse button. Tighten the thumbscrew if the filament doesn’t reverse.
- Reverse your filament completely, and remove the filament.
Does it stop when it should test #
- Push your filament into the unit
- Block the buffer by holding the outlet PTFE in your fist and covering the hole with your thumb.
- When the filament reaches your thumb and tries to keep extruding, the buffer should move away from the gear and the motor should stop.
- Release your thumb. The buffer should move close to the gear, and the filament should start extruding again.
- Remove your filament.
The Setup #
Couldn’t be easier. Here’s how mine is set up on my H2D.
- Power the unit with your 24v power supply
- Hook the inlet of your unit to your spool-side PTFE
- On an X/P series printer, just feed the outlet of the buffer to the external spool input on your printer. On an H2D, connect PTFE from the extruder all the way to the output of the buffer.
- Minimize the amount of PTFE tubing you use, and make sure the bends are gentle.
- Load the filament into the unit.
- Load the filament on your printer’s control panel.
- Print.
Happy printing!
-
If you don’t already have
brewinstalled, you might be jumping into things out of your league. Use another computer, ask a friend, or start googling. ↩︎